

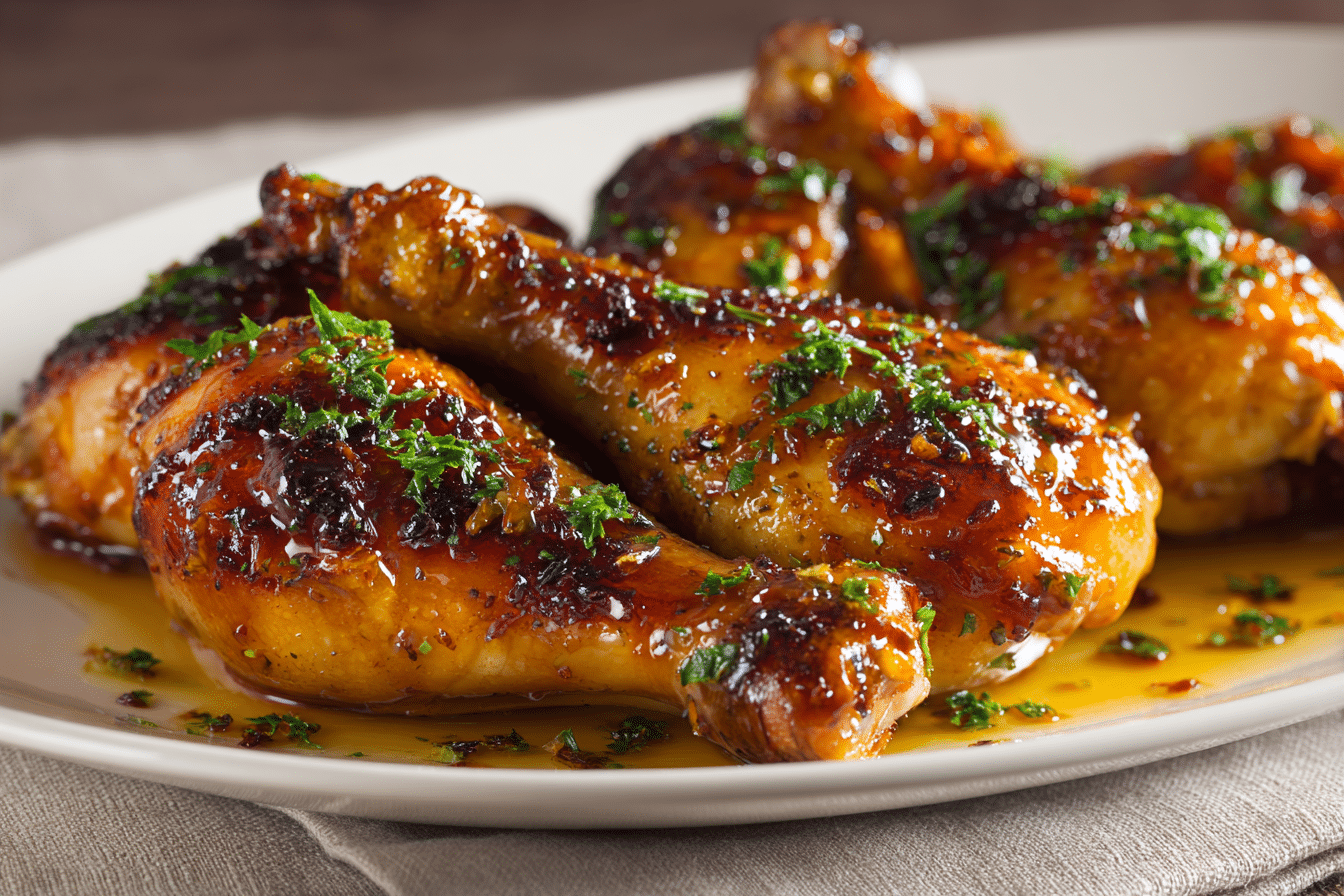
When you’re after a meal that feels like comfort but doesn’t require complicated steps, Honey Butter Garlic Chicken Drumsticks deliver every time. These drumsticks are coated in a sweet and savory glaze that turns irresistibly sticky in the oven. With their juicy interior and crisp, golden skin, they’re the kind of dish you’ll crave again and again.
As the chicken roasts, the scent of butter melting into garlic and honey wraps around the kitchen, creating the kind of warm, homey vibe that invites people to the table. It’s a dish that tastes like it took effort, but in reality, it’s wonderfully simple to put together.
Whether you’re cooking for a family dinner, entertaining on the weekend, or meal prepping for the week ahead, this recipe brings big flavor with very little fuss.
Ingredient Rundown
Every item in this recipe is here for a reason. Together, they build a layered sauce that coats the chicken with rich, bold flavor.
Chicken drumsticks are the perfect choice here. The dark meat stays tender and juicy even after baking, while the skin crisps beautifully under the glaze. Bone-in drumsticks also offer more flavor and are often more affordable than other cuts.
Honey sweetens the glaze and gives it that classic sticky finish. It also helps the sauce thicken as it bakes. You can substitute with maple syrup or agave nectar if necessary, but expect a different taste.
Butter creates a rich, silky base for the sauce. It carries the garlic and honey flavor across the drumsticks and helps everything brown nicely in the oven. Plant-based butter alternatives work well if you’re avoiding dairy.
Garlic, fresh and finely chopped, gives the glaze its deep, aromatic base. It contrasts beautifully with the honey’s sweetness. Garlic powder can be used in a pinch, but fresh is definitely preferred.
Soy sauce adds salt and umami, balancing out the sweetness and helping the glaze achieve a savory depth. Tamari or coconut aminos are great gluten-free alternatives.
Paprika not only adds mild warmth but also gives the chicken a lovely color. Try smoked paprika if you want an extra layer of flavor or a hint of smokiness.
Salt and black pepper round out the seasoning. Since soy sauce adds saltiness, be mindful when adjusting to taste.
Red pepper flakes (optional) can be added for a little heat. Use more or less depending on your spice tolerance.
How to Make It Step by Step
-
Heat the oven to 400°F (200°C). Line a baking dish with foil or coat it lightly with oil to keep the glaze from sticking and to make cleanup easier.
-
Prep the chicken. Use paper towels to pat the drumsticks dry—this step is essential for crispy skin. Arrange them in a single layer in the prepared dish.
-
Add the seasoning. Sprinkle the drumsticks with paprika, salt, and pepper. This base seasoning helps build flavor under the glaze.
-
Make the glaze. In a small saucepan over medium heat, melt the butter. Add the garlic and sauté for about a minute, just until fragrant. Then stir in the honey and soy sauce. Let the mixture bubble gently for 2–3 minutes until it thickens slightly.
-
Coat the chicken. Pour the warm glaze over the drumsticks. Use a spoon or brush to make sure each piece is coated thoroughly.
-
Bake for 35–45 minutes. Halfway through cooking, spoon some of the sauce from the pan over the chicken again. This basting step intensifies the flavor and helps the glaze cling better.
-
Broil briefly (optional). For an even stickier, caramelized finish, broil the drumsticks for 2–3 minutes at the end. Just keep a close eye to avoid burning.
-
Let them rest. After baking, allow the chicken to sit for 5 minutes before serving. This helps the juices redistribute and lets the glaze firm up slightly.
Make sure to give the drumsticks enough space in the baking dish so they roast instead of steam. And watch the broiler closely—glazes with honey can turn from perfect to scorched very quickly.
Tips, Swaps & Creative Spins
Smart Tips:
-
Drying the drumsticks before seasoning helps the glaze stick and the skin crisp up.
-
Basting with pan juices mid-bake keeps everything moist and flavorful.
-
Broiling at the end brings a glossy, slightly charred finish.
Variations to Try:
-
Want spice? Add hot sauce or a pinch of cayenne to the glaze.
-
Citrus lovers: Add a bit of lemon or orange zest for a bright, tangy contrast.
-
Herb-forward: A sprinkle of fresh parsley, thyme, or rosemary adds a fresh twist.
Swaps & Substitutes:
-
Chicken thighs or wings can replace drumsticks—just adjust cooking times.
-
Use vegan butter if you’re keeping it dairy-free.
-
If you don’t have soy sauce, tamari or coconut aminos are excellent backups.
How to Serve & When to Make It
This dish works in so many different settings. Serve the drumsticks with steamed rice, buttery mashed potatoes, or roasted vegetables for a complete meal. A crisp salad or slaw adds a fresh balance to the rich glaze.
They’re ideal for busy weeknights, but they also feel right at home at a casual get-together or Sunday meal. If you’re feeding a crowd, double the recipe—it scales easily and tastes great even when reheated.
For drinks, go with something light and refreshing. Iced tea, lemonade, or even a mild white wine like Pinot Grigio complements the sweetness of the honey glaze.
Nutritional Highlights
Drumsticks offer a solid source of protein and key nutrients like iron and zinc. The glaze, while indulgent, uses natural ingredients and is easy to modify for different diets.
Honey contributes natural sweetness, while garlic provides strong flavor with very little fat or calories. Butter can be reduced or swapped with olive oil if desired.
For a lighter version, consider removing the skin or baking the chicken on a rack to let excess fat drain off. Pairing the dish with vegetables or a salad keeps things balanced.
Frequently Asked Questions
1. Can I bake the drumsticks straight from the freezer?
No—it’s important to thaw the chicken first for even cooking and proper glazing. Thaw overnight in the fridge for best results.
2. What helps keep the chicken moist?
Don’t skip the basting step, and make sure not to overbake. Drumsticks naturally stay juicy, especially if you let them rest before serving.
3. Is this a make-ahead friendly recipe?
Yes. You can prep the glaze and coat the chicken ahead of time. Store in the fridge until ready to bake. Leftovers also reheat well.
4. What can I use instead of soy sauce?
Coconut aminos or tamari are great choices. You could also use a diluted mix of Worcestershire sauce if needed.
5. Do kids usually like this dish?
Absolutely. The sweet glaze is very appealing to younger eaters. Just leave out the spice if you’re serving children.
6. Can this recipe be grilled instead of baked?
Yes—just grill over medium heat and baste regularly. Be cautious, as the honey in the glaze can cause flare-ups.
7. What sides work best with this recipe?
Mashed potatoes, steamed rice, roasted veggies, or a crisp green salad all pair wonderfully with the sweet and savory chicken.
Juicy, oven-roasted chicken drumsticks glazed in a buttery garlic and honey sauce. Sweet, savory, and easy to prepare.
- Prep Time: 15 minutes
- Cook Time: 15 minutes
- Total Time: 30 minutes
- Yield: 4 servings 1x
Ingredients
8 chicken drumsticks
1/3 cup honey
1/4 cup unsalted butter
4 garlic cloves, minced
2 tablespoons soy sauce
1 teaspoon paprika
1/2 teaspoon salt
1/2 teaspoon black pepper
1/4 teaspoon red pepper flakes (optional)
Instructions
-
Preheat oven to 400°F (200°C). Line or grease a baking dish.
-
Pat drumsticks dry. Season with salt, pepper, and paprika.
-
In a saucepan, melt butter and cook garlic for 1 minute.
-
Stir in honey and soy sauce. Simmer for 2–3 minutes.
-
Pour glaze over drumsticks and coat thoroughly.
-
Bake for 35–45 minutes, basting once halfway through.
-
Optional: Broil for 2–3 minutes at the end for extra caramelization.
-
Let rest for 5 minutes before serving.